Is your dehumidifier not performing as it should?
When your dehumidifier’s evaporator coils fail to get cold, it can disrupt the efficiency and performance of the entire unit, leaving your space feeling damp and uncomfortable. Understanding the root causes and knowing how to address them is crucial for restoring your dehumidifier’s functionality.
In this comprehensive guide, we’ll explore the common reasons behind this issue and guide you through practical troubleshooting steps to get your dehumidifier back in working order. Whether you’re dealing with airflow problems, refrigerant leaks, or general maintenance concerns, this guide will help you uncover the solutions you need to keep your home’s humidity levels under control.
Understanding Dehumidifier Coils
Dehumidifier coils are essential to getting rid of extra humidity in the atmosphere. The whole process involves two types of coils: evaporator coil and condenser coil. The first one cools down the surrounding air, which results in moisture being turned into tiny drops of water, and the water is collected in the unit’s reservoir. At the same time, the condenser coil returns the dry air to the environment.
💡 Maintenance Tip: It is very important to keep the appliance in good condition by doing regular maintenance like cleaning the coils and looking for dirt or frost build-up, as it can increase the efficiency of your dehumidifier and save you from common problems such as reduced airflow or water leakage.
What Are Dehumidifier Coils?
Coils in dehumidifiers are the main parts that help in moisture removal from the air. They are classified into two types:
- Evaporator Coils: Get cool first and then the air passing over them also gets cooled, leading to moisture condensing into water droplets that are collected in the unit’s reservoir
- Condenser Coils: Reheat the dehumidified air before releasing it back into the room
⚠ Important: If coils are not maintained properly, the dehumidifier can become less effective, and problems like airflow restriction or system breakdown can occur. Regular cleaning and keeping the coils free from dirt, debris, and frost is necessary to maintain the dehumidifier’s efficiency.
How Evaporator Coils Work in Dehumidifiers
The evaporator coils are the key components in a dehumidifier that allow air to lose moisture. Here’s how the process works:
- Air Intake: A fan draws warm and humid air from the room into the dehumidifier
- Cooling Process: Air passes through cold evaporator coils cooled by the dehumidifier’s cooling system
- Condensation: Moisture in the air condenses into water droplets that flow into the reservoir or drainage system
- Reheating: The dehumidified air is heated by the condenser coils
- Release: Dry, warm air is sent back to the room
Modern Technology: Evaporator coils in modern dehumidifiers are made of advanced materials and techniques which guarantee high efficiency. The use of high-efficiency coils with enhanced thermal conductivity is getting popular in new models, leading to quicker and better dehumidification with minimal energy use.
Proper care like routine cleaning and preventing ice formation on the coils will ensure the coils last long and work at their best. Regular maintenance helps keep the innovative energy-saving techniques of modern dehumidifiers working optimally and maintains a comfortable, dry indoor environment without the risk of mold growth or structural damage due to excess humidity.
The Role of Refrigerant in Cooling Coils
Refrigerant is an essential element in cooling coils operation, taking an active part in the process of heat transfer that is of great necessity for cooling and dehumidification. The refrigerant absorbs heat while the air getting cooled and dehumidified passes over the coils. After that, the refrigerant is changed from gas at low pressure to liquid at high pressure.
During this cycle, the heat from indoor air is drawn out, and the cooling coil then not only lowers the temperature but also, by condensation, enables effective moisture removal through the dehumidification process.
Environmental Progress: The refrigerants used today are highly advanced and have the capability of making the whole process of cooling and dehumidification more efficient while still being environmentally friendly, reducing the carbon footprint through less greenhouse gas emissions.
Technology has come a long way and the new refrigerants R-32 and R-1234yf have their global warming potential (GWP) much lower than the old refrigerant R-410A, thus being a big leap towards environment-friendly cooling solutions.
The cooling systems of today require both regular maintenance and the right amount of refrigerant as the two main factors to be able to get the best performance and the longest lifespan.
Common Causes of Coils Not Getting Cold Enough
Several factors can prevent your dehumidifier coils from getting cold enough to operate effectively. Understanding these causes is the first step in troubleshooting:
🧹 Dirty Coils
Over time, evaporator and condenser coils can become heavily coated with dust, dirt, and other impurities. This thick covering of debris acts like an insulator, hindering proper heat exchange and resulting in cooling inefficiencies.
❄️ Refrigerant Issues
If the system has less refrigerant due to a leak or wrong levels, then coils may not be able to absorb enough heat and hence stay warmer than required.
🚫 Blocked Airflow
Setback in the cooling process caused by airflow being restricted owing to clogged filters, blocked vents, or ductwork can lead to coils not being cooled enough.
⚙️ Faulty Components
An unreliable compressor, expansion valve, or thermostat could potentially disturb the refrigeration cycle, causing the coils to work under unfavorable conditions.
📊 System Overload
If the air conditioner is overloaded because of extreme external temperatures or poor cooling of a larger space than it can accommodate, it will lead to an overall reduction of cooling performance.
Insufficient Refrigerant in Your Dehumidifier
The performance of your dehumidifier can be greatly affected by the most common problem which is insufficient refrigerant. The unit will not be able to work properly at all if there is not enough refrigerant and it will also lead to poor dehumidification.
Common Cause: This problem usually occurs because of leaks in the system or the lack of proper maintenance. Recent data shows an increase in searches for “why is my dehumidifier not working,” which means more people are becoming aware of such problems.
The Solution: Check the unit for any leaks and get it serviced by a certified technician to recharge the refrigerant and make sure the dehumidifier is working to its best capacity. If you want to avoid refrigerant problems in the future, then you should do regular maintenance and keep an eye on the status of the unit.
Issues with the Fan Motor and Airflow
| Issue | Cause | Solution |
|---|---|---|
| Dust and Debris Build-Up | Dust accumulation on fan blades or in motor housing stops airflow | Regular cleaning to control this problem |
| Worn-Out Fan Motor | Constant use causes motor wear, resulting in weak or no airflow | Motor replacement required |
| Blocked Air Filters | Dirty and dusty air filters totally block airflow | Clean or replace air filters regularly |
| Damaged Fan Blades | Cracks or twisting in fan blades cause loss of efficiency | Replace damaged fan blades |
| Improper Motor Alignment | Incorrectly positioned motor leads to less fan rotation | Return motor to correct position |
Temperature Sensor and Humidity Control Problems
The performance of your equipment can be greatly affected by problems with the temperature sensor or humidity control system. The malfunctioning of temperature sensors could yield false readings, which in turn would result in incorrect setting of the internal environment.
Potential Consequences:
- System could be working too hard
- Might not be able to maintain desired conditions
- Cut down on efficiency and lifespan
- Too much moisture promoting mold growth
- Too little moisture causing dry air that could damage delicate parts or materials
Diagnosing the Problem
In order to properly diagnose the issue, the first step is to check for any unusual behaviors in the system’s operation, such as unwanted temperature or humidity levels that are not in accordance with the desired settings.
Modern Diagnostic Approach: You are able to gather real-time data through the application of sophisticated diagnostic tools or along with built-in system sensors to discover possible faults or areas where inefficiency is present.
Recent data from search trends indicates that a great number of users attribute their problems to:
- Clogged filters
- Malfunctioning sensors
- Use of obsolete software for environmental control management
Conducting routine maintenance and updating software regularly are among the most popular solutions that have been searched the most, underlining their significance in overcoming ordinary issues. You will be able to accurately determine and fix the main reason for the system’s inefficiency by combining proper monitoring and useful insights.
Checking the Thermostat Settings
The issue of improper thermostat settings and their effects on system performance is a frequent concern. Latest statistics suggest that wrong temperature settings are mainly responsible for high energy consumption and poor system performance.
Common Problems:
- Setting the thermostat too high or too low causes the system to work harder than it should, eventually resulting in increased wear and tear
- Not changing between the correct modes (heating, cooling, or auto mode) may result in the system running at the wrong season
Solution: Having the thermostat calibrated, set to the right mode, and programmed for energy-efficient operation will not only help eliminate inefficiencies but also improve the overall performance of the system.
Inspecting for Blockages in the Cooling Coils
Cooling coils are the heat exchangers of an HVAC system, so their cleanliness directly affects the system’s overall performance. Apart from the dirt that comes with time, these coils might also get blocked by dust and debris, thus preventing air flow through the system and, in turn, causing reduced efficiency.
Consequences of Blocked Coils:
- More energy consumption
- Increased costs
- Stress on HVAC components
- Reduced cooling performance
1 Inspection Process
Turn off the HVAC system and gain access to the coils (most of the time in the indoor unit of the air handler). Look for dirt or debris visible with naked eye.
2 Gentle Cleaning
If dirt is present, gently remove the accumulation using a soft brush or a coil cleaner.
Maintenance Reminder: Regular checking and cleaning can not only remove blockages but also provide good airflow and cooling performance. Recent search data supports this notion by indicating that upkeep of coils is one of the most frequently overlooked maintenance tasks by owners, which underscores the need for regular maintenance to improve the system’s lifespan and keep it running efficiently.
Evaluating the Dehumidifier Model Specifications
It is essential to assess performance and energy efficiency directly when taking the specifications of dehumidifier models into consideration. According to the most recent information, a large number of consumers often inquire about:
- Capabilities – Capacity determined by room size and humidity amount
- Energy Usage – Energy efficiency ratings implying long-term savings
- Smart Features – Enhanced functionality and ease of use
Popular Features: Automated shutoff, continuous drainage options, and humidity level displays are popular, making it easier to use the appliance and providing flexibility in its operation.
This data underlines the importance of thorough specification evaluation to choose the unit based on personal requirements, and thus effective moisture control and efficiency optimization will be realized.
Steps to Troubleshoot Your Dehumidifier
Follow these systematic steps to diagnose and fix issues with your dehumidifier:
1 Check the Power Supply
Make sure that the dehumidifier is connected to an outlet that is in good working condition. Check that there are no problems with the power source. If you want to be sure that the outlet is working, unplug your device and plug in another one. If necessary, check your home’s circuit breaker to make sure that a breaker has not tripped.
2 Inspect the Water Collection Bucket
Water collection tanks are among the main reasons dehumidifiers stop working. They either get full or are not placed properly. In case the bucket is full, remove the water and verify that it is properly positioned.
3 Clean or Replace the Air Filter
Dehumidifiers can lose their effectiveness just because of a simple dirty air filter. Find this information from the manufacturer’s literature. It is very easy to read and understand.
4 Ensure Proper Temperature and Ventilation
A dehumidifier is very sensitive to environmental conditions. If the room is very cold, then the coils may freeze which eventually stops the operation. Check the placement of the unit and the temperature of your room and also make sure that the unit has enough space around it for proper airflow.
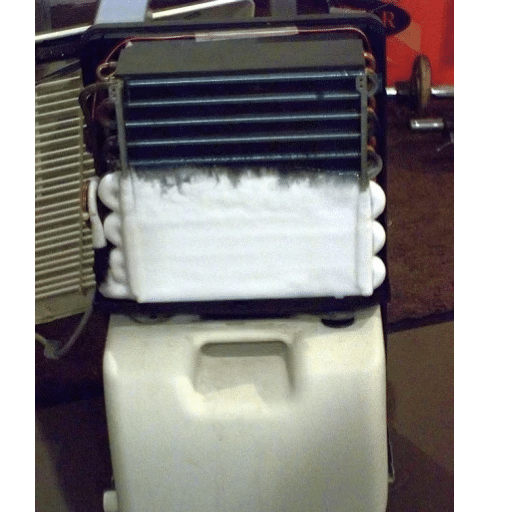
5 Check for Frost or Ice Build-Up
When the dehumidifier operates in a colder environment, the coils might get covered with frost, thus reducing its performance. Power off the unit and let it cool and defrost for a while, then start it again.
6 Inspect and Clean the Coils
If your evaporator or condenser coils are dirty, the performance of the dehumidifier will surely be affected. Disconnect the appliance from the power supply, then using a soft brush or cloth clean the coils gently to remove dirt or deposits.
7 Verify the Humidity Sensor and Settings
If your dehumidifier is not performing as expected, check the humidity level setting. Also, check if the sensor is working correctly, then set it to a recommended range (usually 30-50%).
8 Check the Drainage System
If the dehumidifier is operating with a continuous drain mode, make sure that the hose is neither clogged nor kinked. Ensure that the drainage system is free for water to flow through.
9 Look for Error Codes
If your dehumidifier has a digital display, see if there are any error codes indicating certain malfunctions. Check the user manual for interpreting these codes and follow the suggested steps to fix the problems.
10 Contact Professional Support
If none of the troubleshooting steps work, it might be the right time to reach the manufacturer’s customer support or bring in a technician to figure out and fix the problem.
How to Check Refrigerant Levels
⚠ Safety First: Handling refrigerants may not be safe or legal without proper training. If you suspect refrigerant issues, it is advisable to call a qualified HVAC technician or your dehumidifier’s manufacturer.
Step-by-Step Process (for certified professionals only)
1 Turn Off and Unplug the Dehumidifier
Before doing any checks, be sure that the dehumidifier is off and disconnected from the power supply for safety reasons.
2 Monitor Performance Symptoms
Symptoms such as inefficiency, ice build-up on coils, or too much heat could point to low refrigerant. If they are there, then inspection is likely to be needed.
3 Inspect the Coils
Look closely at both the evaporator and condenser coils to see if there are any signs of freezing, damage, or low cool air output since these might indicate refrigerant problems.
4 Use a Refrigerant Pressure Gauge (certified professionals only)
Connect a pressure gauge to the service valve (usually located near the compressor) to check the refrigerant pressure. Compare the pressure readings with those specified by the manufacturer in the user manual to determine if the levels are adequate or if there is a leak.
5 Look for Leaks
Check for any signs of refrigerant leaks like oil stains or damage around refrigerant lines. Since refrigerant forms a closed system, any leaks must be attended to without delay.
6 Contact a Professional
Dehumidifiers are sophisticated appliances. If you think that there is not enough refrigerant, call a qualified HVAC technician or your dehumidifier’s manufacturer. They will safely test, refill or repair the system as needed.
Testing the Temperature Sensor and Humidity Sensor
| Test Method | Procedure | What to Look For |
|---|---|---|
| Check For Error Codes | Up-to-date dehumidifiers usually have an integrated diagnostic system that shows error codes whenever a sensor malfunctions | Consult the user manual for understanding specific codes for your device |
| Use An External Device | Take readings from the dehumidifier’s sensors and check against a reliable external thermometer and hygrometer. Place both devices in the same room for 15-20 minutes | If dehumidifier’s readings are way off from external devices, calibration or sensor replacement may be necessary |
| Inspect Sensor Connections | Switch off and unplug the dehumidifier properly before doing this. Take a close look at sensor connections and wiring | Check for any visible damage such as fraying or loose connections, and ensure sensors are properly locked into their slots |
| Check For Obstructions | Sensors might stop functioning appropriately due to dust and dirt buildup | Very gently use a soft cloth or small brush to clean sensor surfaces |
Cleaning and Maintaining the Coils
To keep your dehumidifier working efficiently and smoothly, it is very important to regularly clean its coils. The company’s recommendation is that the coils be cleaned to avoid the problems of performance reduction, increased power consumption, and possible damage to the device over time.
💡 Cleaning Guidelines:
- Start by ensuring the dehumidifier is completely unplugged to eliminate the risk of electric shock
- Use a soft brush or vacuum cleaner equipped with a brush attachment to gently remove dust, dirt, and debris from the coil’s surface
- For more stubborn dirt or grime, use a slightly damp cloth to wipe the coils
- Make sure coils are completely dry before switching the dehumidifier back on
- For really dirty or coated coils, use cleaning agents specifically designed for coil maintenance, following manufacturer’s instructions
Cleaning Process Step-by-Step
1 Safety First: Unplug the Unit
Always ensure the dehumidifier is completely unplugged from the power source before beginning any maintenance work. This eliminates the risk of electric shock and ensures your safety throughout the cleaning process.
2 Access the Coils
Remove any access panels or covers according to your manufacturer’s instructions to gain clear access to both the evaporator and condenser coils.
3 Initial Debris Removal
Use a soft brush or vacuum cleaner with a brush attachment to gently remove loose dust, dirt, and debris from the coil surfaces. Be careful not to bend or damage the delicate coil fins.
4 Deep Cleaning (if needed)
For stubborn dirt or grime, use a slightly damp cloth to carefully wipe the coils. Alternatively, apply a coil cleaner specifically designed for HVAC systems according to the product instructions.
5 Drying Time
Ensure the coils are completely dry before reassembling the unit and plugging it back in. This may take 30-60 minutes depending on humidity levels and cleaning method used.
6 Reassemble and Test
Replace all access panels and covers, plug the unit back in, and test its operation to ensure proper functioning.
When to Seek Professional Help
If your dehumidifier keeps misbehaving, calling a technician would be a smart move. Recognizing when professional intervention is necessary can save you time, money, and prevent further damage to your unit.
Signs You Need a Technician
⚠ Call a Professional If You Experience:
- Machine not able to lower humidity levels sufficiently
- Making strange noises during operation
- Leaking all the time despite proper maintenance
- Displaying error codes that are not cleared by basic troubleshooting
- Coils not getting cleaned properly no matter how many times you clean them
- Suspected problems with electrical components
- Bad smell that doesn’t go away even after cleaning
- Need for complex maintenance like filter or refrigerant replacement
According to the most recent search engine data, a lot of users say they go to an expert when their dehumidifier starts smelling bad or when maintenance works like filter or refrigerant replacement, which are deemed too complex, are needed. A professional service guarantees not only correct diagnosis and repair but also longer life for your appliance.
Understanding Repair Costs
One of the main factors that affect repair costs is understanding the situation. Recent data reveals that the repair cost issues people often search for are generally connected to:
| Cost Factor | Description | Impact on Price |
|---|---|---|
| Type of Appliance | Different dehumidifier models have varying complexity levels | Higher-end models may cost more to repair |
| Problem Intensity | Minor leak vs. major compressor failure | Simple fixes are cheaper than major component replacement |
| Parts Needed | Availability and cost of replacement parts | Rare or specialized parts increase costs |
| Labor Costs | Skill level required and service provider location | Varies by region and technician expertise |
| Maintenance History | Well-maintained units vs. neglected units | Regular maintenance minimizes sudden, expensive repairs |
💡 Cost-Saving Tip: Regular maintenance is often suggested to users as a way to keep sudden expenses at bay since it not only helps in minimizing repair costs but also prolongs the lifespan of the appliance.
Choosing the Right Professional for Your Dehumidifier
When it comes to choosing a professional to repair or maintain your dehumidifier, the task may seem difficult, but if you take a systematic approach, it will be easy.
Step 1: Research Local Technicians
Search and find local technicians or companies that have experience with dehumidifiers. The most recent information indicates that reviews and ratings are among the major criteria that customers base their decisions on.
What to Look For:
- Professionals who display high ratings consistently
- Positive reviews from customers
- Experience that signifies reliability and quality service
Step 2: Verify Certifications
Check that the technician has the proper certification and is experienced with your particular brand or model. Manufacturers often maintain lists of authorized repair professionals or service centers that are accessible via their websites or support pages.
Step 3: Compare Quotes
Obtain multiple quotes for comparison purposes—pricing and service are the factors to look at. This helps ensure you’re getting fair pricing and comprehensive service for your dehumidifier.
Step 4: Make an Informed Decision
By combining your in-depth research with reviews and certifications, you can choose a professional without hesitation, maximizing the chances of finding someone who will provide efficient and effective service for your dehumidifier.
References
-
Cornell Cooperative Extension: Discusses factors affecting dehumidifier performance, such as low air temperature causing moisture to freeze on the cooling coil, reducing efficiency. Read the resource.
-
U.S. Department of Energy: Explains the role of cooling coils in high-efficiency dehumidification systems and their impact on air drying. Access the document.
-
Barron County, Wisconsin Government: Provides an overview of how dehumidifiers work, including the role of cooling coils in lowering temperature below the dew point to cause condensation. View the guide.
Frequently Asked Questions (FAQ)
Why are the coils of my dehumidifier not cold?
A dehumidifier’s working coils not being cold usually indicates that they are not cooling properly for various reasons. The typical culprits are low refrigerant levels, a broken compressor, or icing up the humidistat. It is important to identify the issue and take corrective measures so that the dehumidifier works efficiently.
What does it signify if the dehumidifier’s coils are covered in ice?
Freezing of the dehumidifier coils is commonly the result of a lack of airflow or a drop in refrigerant levels. If the evaporator is not receiving enough air or the temperature is just too low, ice can build up on the coils. This would also contribute to the reduction of the dehumidifier’s efficiency.
How does temperature of the room interact with operation of the dehumidifier?
The temperature of the room is a significant factor in the operation of the dehumidifier. The dehumidifier can effectively work when the room temperature is above 65 °F. Conversely, when the temperature is below this point, it might not only have the difficulty of dehumidifying but also coil freezing as a consequence.
What to do in case the dehumidifier has low refrigerant?
In case of low refrigerant in the dehumidifier, it is crucial to have an expert technician recharge the unit. The low refrigerant not only leads to the cooling problem in the coils but also causes the compressor not to work right which means the dehumidifying process will be of no effect.
How can I check my dehumidifier’s control board for problems?
If you think that the control board is defective, look for any physical damage or rust. Also, check that all connectors are fastened properly. If the problems still exist, it might be necessary to note your dehumidifier’s model number and get professional troubleshooting help.
What is the reason for the fan blade and blower wheel of my dehumidifier not functioning?
Poor air circulation would be the result of a non-functioning blower wheel and fan blade. If these parts are not operating well, the air will not be able to go through the coils which would then result in less cooling and less moisture removal. Possibly, these elements will have to be replaced for maximum performance.
What is the working principle of the defrost thermostat in my dehumidifier?
The defrost thermostat is a critical component that prevents the coils from freezing. It monitors the temperature of the coils and when it is too cold, it instructs the compressor to shut down. When the defrost thermostat is damaged, it may cease to function correctly and this eventually results in frozen coils.
What if my new dehumidifier is unable to remove humidity?
In the event that the new dehumidifier is not able to remove moisture as it should, check the room temperature first and make sure it is above 65 degrees. Also, ensure the humidistat is properly calibrated. If it still has problems, the compressor or refrigerant levels may require attention.