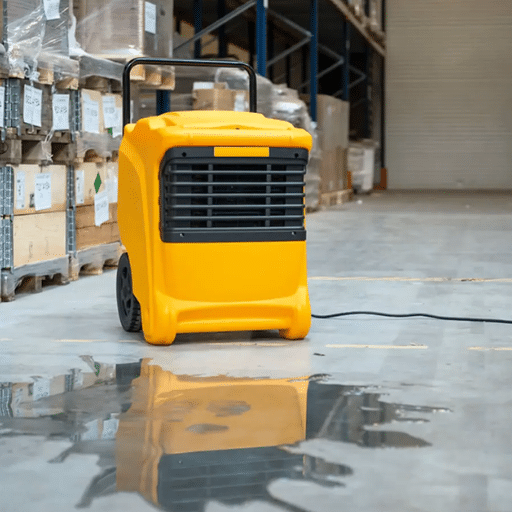
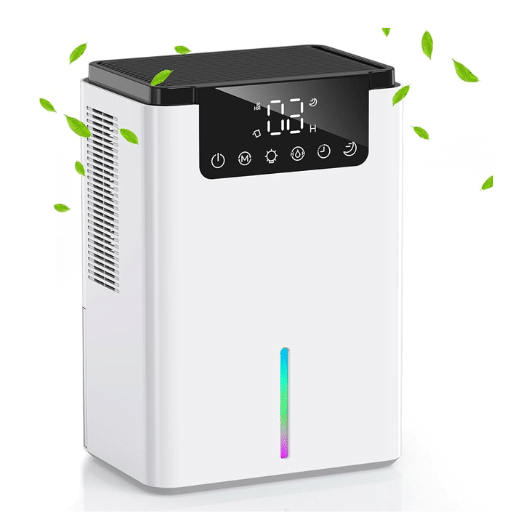
Dehumidifiers are essential appliances for maintaining a healthy and comfortable indoor environment, especially in areas prone to high humidity. However, even these handy devices can run into problems, and one of the most common issues homeowners face is a dehumidifier that freezes up unexpectedly. Why does this happen, and what can you do about it? This guide dives deep into the reasons behind this frustrating scenario, offering practical troubleshooting steps and effective repair solutions. Whether you’re trying to preserve air quality, prevent mold, or protect your space from excess moisture, this article will equip you with the knowledge to get your dehumidifier back in top working condition. Let’s uncover the root causes and actionable fixes, so you can enjoy a hassle-free experience once again.
What Causes a Dehumidifier to Freeze?
A dehumidifier can freeze due to several common factors:
- Low Room Temperature – If the surrounding temperature drops below 65°F, the coils may freeze as the device is designed to operate efficiently in warmer environments.
- Restricted Airflow – Blocked or dirty air filters can reduce airflow, causing moisture to accumulate and freeze on the coils.
- Faulty Components – Malfunctioning parts, such as a damaged fan or low refrigerant levels, can disrupt the dehumidifier’s ability to regulate its temperature, leading to freezing.
Understanding Humidity Levels and Their Impact
Humidity plays a critical role in determining indoor air quality and overall comfort. Ideally, indoor relative humidity levels should range between 30% and 50%, as recommended by many experts. When humidity levels fall below or rise above this range, it can lead to several issues affecting both the environment and personal well-being.
When indoor humidity is too low, it can cause discomfort such as dry skin, throat irritation, and respiratory issues. Prolonged exposure to low humidity may also result in the drying and cracking of wooden furniture and flooring. On the other hand, high humidity levels invite different challenges, including the growth of mold and mildew, leading to allergies or asthma symptoms. Excessive moisture in the air can also create an environment conducive to dust mites, further compounding health risks.
Furthermore, prolonged high humidity often impacts energy efficiency. For instance, it makes air feel warmer than it actually is, potentially causing an overuse of air conditioning systems in an effort to maintain a comfortable indoor temperature. This contributes to higher energy consumption and electricity bills. By contrast, maintaining proper humidity levels can greatly enhance energy efficiency and reduce wear on heating and cooling systems.
Data reveals that managing indoor humidity effectively not only contributes to a healthier and more pleasant living environment but also extends the longevity of household systems and structural materials. Simple solutions, like using a well-maintained dehumidifier, adding sufficient ventilation, and utilizing UV filters, can significantly help regulate indoor humidity conditions.
How Ambient Temperature Affects the Dehumidifier
Dehumidifiers function most efficiently within specific temperature ranges, and ambient temperature plays a critical role in their performance. Most standard dehumidifiers are designed to operate effectively in temperatures above 65°F, as lower temperatures can cause moisture in the air to freeze on the dehumidifier’s coils, reducing its ability to extract water. For instance, at temperatures below 60°F, traditional compressors may struggle, leading to diminished efficiency and potential damage over time.
However, advancements in technology, such as desiccant dehumidifiers, have addressed this challenge. Unlike compressor-based models, desiccant dehumidifiers are better equipped to function in lower temperatures, making them ideal for cooler environments like basements or garages. According to industry insights, desiccant dehumidifiers remain effective even when operating in environments as cool as 33°F. These systems utilize a moisture-absorbing material, ensuring steady performance regardless of the ambient temperature.
For homeowners in colder climates, selecting the right dehumidifier type is critical to maintaining optimal humidity levels year-round. Additionally, placing units in well-ventilated areas and following manufacturer guidelines can further improve performance, regardless of fluctuations in surrounding temperature.
Role of the Evaporator Coil in the Freezing Process
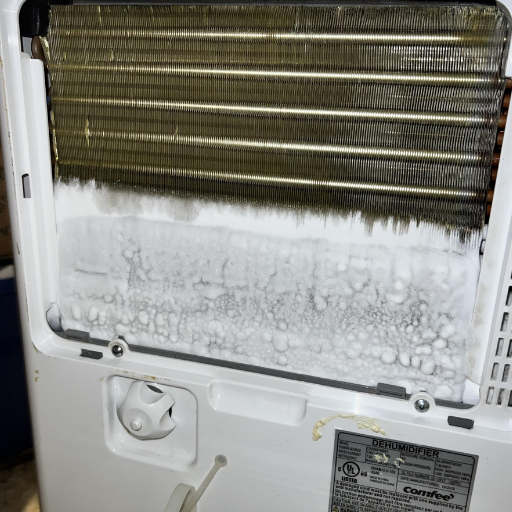
The evaporator coil plays a vital role in the freezing process by facilitating the transfer of heat, which is essential for cooling and dehumidification systems. This component works by absorbing heat from the surrounding air as refrigerant flows through the coil. When air passes over the coil, the temperature drops rapidly, causing moisture in the air to condense. If the coil surface becomes too cold, typically below the freezing point of water, the moisture can freeze on the coil’s surface, forming ice.
Factors such as insufficient airflow, low refrigerant levels, or excessively low system operating temperatures can cause the evaporator coil to freeze. For example, a reduction in airflow due to clogged filters or obstructed vents diminishes the warm air supply to the coil, increasing the likelihood of freezing. Data shows that a refrigerant level below the manufacturer’s specifications reduces pressure in the system, leading to a lowered temperature on the coil and a higher chance of ice formation.
To mitigate coil freezing, it is important to maintain optimal system conditions. This includes regular cleaning of air filters, ensuring adequate airflow, and monitoring refrigerant levels. Many modern systems are equipped with defrost cycles to prevent excessive ice buildup, which can impede efficiency and potentially damage the system. Maintaining these systems not only ensures more consistent performance but also extends the lifespan of cooling and dehumidification equipment.
How Can You Fix a Dehumidifier That Is Freezing?
- Turn Off and Unplug the Dehumidifier – To ensure safety, disconnect the unit from power before inspecting or fixing it.
- Check the Room Temperature – Dehumidifiers can freeze if used in temperatures below their operating range, typically 65°F or lower. Use the unit in a warmer room or a basement-specific model designed for low temperatures.
- Inspect the Air Filter – A clogged filter restricts airflow, leading to freezing. Clean or replace the air filter regularly as per the manufacturer’s recommendations.
- Ensure Adequate Airflow – Place the dehumidifier in an open area with at least a few inches of clearance around it for proper ventilation.
- Monitor Refrigerant Levels – If other fixes don’t work, low refrigerant levels might be the issue. This requires professional servicing, as handling refrigerants can be hazardous.
- Check for Frost Build-Up – Allow the frozen parts to thaw completely before restarting the unit. Many models feature an auto-defrost mode that prevents freezing.
If the freezing issue persists even after following these steps, consulting a technician or contacting the manufacturer for assistance is recommended.
Checking and Cleaning the Filter
Regular maintenance of your dehumidifier’s filter is crucial for ensuring optimal performance and efficiency. Over time, filters can accumulate dust, debris, and airborne particles, which may obstruct airflow and reduce the unit’s effectiveness. To check and clean the filter, follow these detailed steps:
- Turn Off and Unplug the Unit
Before inspecting or removing the filter, safely turn off the dehumidifier and disconnect it from the power source. This minimizes any risk of injury or damage to the unit.
- Locate the Filter
Refer to your dehumidifier’s user manual to identify the exact location of the filter. Typically, most filters are easily accessible from the back or side of the unit and are designed for quick removal.
- Inspect the Filter for Debris
Carefully remove the filter and examine it for visible signs of dirt, dust, or discoloration. If the filter appears clogged or soiled, it requires cleaning.
- Clean the Filter Properly
Depending on the type of filter provided with your dehumidifier, you can either:
-
-
- Washable Mesh Filters – Rinse the filter under lukewarm running water. Use a soft brush or cloth to gently remove stubborn dirt or buildup. Ensure the filter dries completely before reinserting it.
- Replaceable Filters – If the dehumidifier uses a disposable filter, replace it with a new one based on the manufacturer’s recommendations.
-
- Frequency of Maintenance
Industry data suggests that filters should be cleaned or replaced every one to three months during peak usage. However, this timeline may vary depending on environmental factors, such as the presence of pets, high dust levels, or excessive humidity.
By consistently maintaining the filter in your dehumidifier, you can enhance its efficiency, prolong its lifespan, and improve indoor air quality. A well-maintained filter supports proper airflow and prevents strain on the dehumidifier’s internal components, ultimately saving energy costs over time.
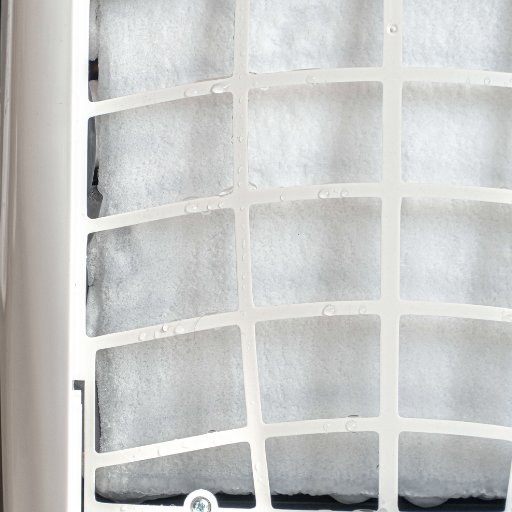
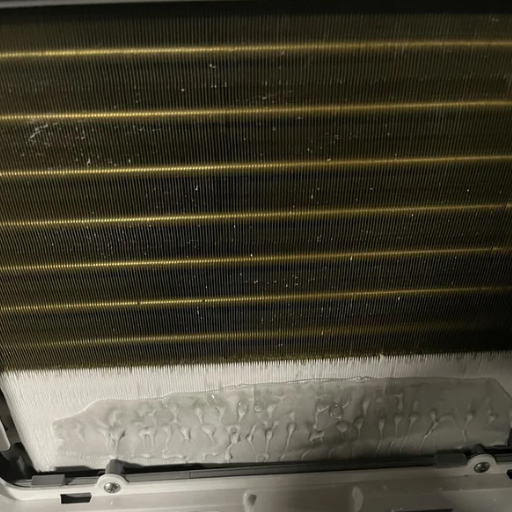
Inspecting the Coils for Ice Build-Up
Ice build-up on the coils of your dehumidifier can severely impact its performance and efficiency. This problem often occurs when the surrounding temperature is too low for the device to function effectively. Most dehumidifiers operate optimally within a temperature range of 65°F to 85°F. If the ambient temperature dips below 65°F, the coils may freeze, obstructing airflow and reducing moisture removal capacity.
To inspect for ice build-up, first, unplug the device and allow it to thaw if ice is visible. Check the evaporator coils, which are typically located behind the air filter, for any frost formation. A dirty filter can also contribute to ice accumulation, as restricted airflow causes the coils to cool excessively. Ensure hoses or drainage systems are clear, as backed-up condensate can exacerbate freezing.
Preventative measures include placing the dehumidifier in a warmer location and ensuring it is designed for low-temperature operation, often labeled as “low-temperature” or featuring automatic defrost options. Regular cleaning of the coils and maintaining the proper temperature settings can prevent recurring ice problems, enhancing energy efficiency and the lifespan of your appliance.
Why Is the Dehumidifier Ice Forming on the Coil?
Ice forms on the dehumidifier coil when the surrounding temperature is too low or the airflow is obstructed. Dehumidifiers are designed to operate efficiently within a specific temperature range, typically above 41°F (5°C). If the air is too cold, the moisture extracted from it can freeze on the coils. Additionally, dirty air filters, blocked vents, or fan issues can reduce airflow, preventing the proper circulation of air and contributing to ice build-up. Ensuring the dehumidifier operates in a suitable environment and keeping the filters and vents clean are key to preventing this issue.
Impact of Low Refrigerant Levels
Low refrigerant levels in a dehumidifier can significantly impair its performance and efficiency. Refrigerant is a critical component of the cooling system, as it facilitates the condensation of moisture in the air. When levels drop, the system struggles to maintain the necessary temperature differential, leading to insufficient moisture removal. This condition may also cause the coils to become excessively cold, increasing the likelihood of ice formation and further reducing functionality.
Industry studies reveal that even a 10% reduction in refrigerant levels can lead to a drop in efficiency of up to 20%, while more significant losses can render the unit incapable of proper dehumidification. Signs of low refrigerant levels include excessive cycling, failure to reduce humidity levels effectively, and unusual noises from the compressor. Addressing this issue often requires professional servicing to locate and repair potential leaks, followed by a precise recharge of refrigerant to restore optimal system performance. Proactive maintenance and regular inspections are recommended to prevent such problems, ensuring a longer lifespan for dehumidifiers and sustained energy efficiency.
Diagnosing Airflow Issues
Airflow issues in dehumidifiers can significantly reduce their efficiency and effectiveness over time. Common signs of airflow problems include reduced moisture extraction, uneven room humidity levels, or the unit overheating. Such issues are typically caused by clogged filters, blocked vents, or malfunctioning fans.
To diagnose these problems, start by inspecting the air filter. Dehumidifiers with a dirty or clogged filter cannot circulate air properly, reducing overall performance – it is recommended to clean or replace the filter every one to two months depending on usage. Additionally, blocked vents could obstruct airflow; ensure that there is adequate clearance around the dehumidifier, with at least 12 inches of space on all sides.
Checking the fan is equally important, as a damaged or slowed fan motor can limit air movement within the unit. Testing the fan may require accessing the internal components, which should be done carefully to avoid causing further issues. Studies have shown that regular maintenance, such as cleaning filters and vents, can improve a dehumidifier’s airflow efficiency by up to 30%, extending its lifespan and improving energy consumption. Prioritizing these steps ensures a healthier indoor environment and optimal equipment performance.
Is Your Thermostat Working Properly?
A malfunctioning thermostat can significantly impact the comfort and energy efficiency of your home. To determine if your thermostat is working properly, start by ensuring it is set to the correct temperature mode—heating or cooling—and verify that the temperature displayed matches the actual indoor conditions. If there is a discrepancy, it could indicate calibration issues or sensor malfunctions. Modern programmable or smart thermostats offer enhanced accuracy, but even they can experience connectivity or software issues.
Studies indicate that over 40% of HVAC system issues stem from thermostat problems, including poor wiring connections, outdated models, or dead batteries. Regularly cleaning the thermostat to remove dust and debris can prevent interference with its sensors. Advanced diagnostics, such as monitoring your HVAC system’s cycles, can reveal whether the thermostat is accurately signaling the system to turn on or off. For added precision, many homeowners are now upgrading to smart thermostats, which can lower energy bills by up to 10% through efficient temperature management.
If troubleshooting does not resolve the issue, it may be time to consult a professional HVAC technician. They can perform in-depth inspections to rule out more complex problems and ensure your HVAC system and thermostat are operating harmoniously.
How to Prevent Your Dehumidifier from Freezing?
To avoid having your dehumidifier freeze up, implement the following steps:
Keep Room Temperature Up – Dehumidifiers work best in a warmer environment, and so should be used in a space with a temperature above 60°F.
Make Sure There Is Space Around the Unit – The area around the humidifier must be free of walls and furniture to ensure unrestricted air circulation.
Ensure Clean Coils – The evaporator coil must be serviced on a regular basis, as dust and debris collection can result in hindered performance and freezing.
Frequent Tank Emptying – The unit’s water tank should also be kept at the appropriate level to prevent overfilling which can impact the unit’s performance.
Check The Device’s Filter – To uphold performance and efficiency, the air filter must replaced or cleaned as per the manufacturer’s guidelines.
When these recommendations are implemented, the risk of the dehumidifier freezing is minimal and ensures that it functions effectively.
Maintaining Humidity Control in the Room
Proper humidity control plays a pivotal role in creating a comfortable and healthy indoor environment. The ideal indoor relative humidity level typically ranges between 30% and 50%, as recommended by environmental health experts. Maintaining this balance helps to prevent the growth of mold, mildew, and dust mites while also safeguarding respiratory health and preserving furniture and building materials.
To manage humidity effectively, consider using a hygrometer to monitor levels regularly. If the humidity exceeds 50%, a dehumidifier can be employed to remove excess moisture from the air. On the other hand, for environments with exceptionally low humidity—especially during winter months—adding a humidifier can help combat issues like dry skin, irritated sinuses, and static electricity.
Data reveals that high indoor humidity can lead to accelerated mold growth within 24 to 48 hours in damp conditions, making timely interventions crucial. Additionally, excessively dry air with humidity levels below 30% may increase the spread of respiratory viruses, as well as cause wood furniture to crack and warp over time.
By investing in proper equipment and following a regular maintenance routine, you can ensure optimal humidity levels in your space. Enhancing ventilation, sealing leaks, and placing moisture-absorbing plants or materials like silica gel can further contribute to maintaining a balanced environment for both comfort and wellness.
Keeping the Room Temperature Above 65 Degrees
Maintaining a room temperature above 65 degrees Fahrenheit is critical for both comfort and health, particularly in colder seasons. Research indicates that a consistent indoor temperature of 65–70 degrees helps prevent common health issues such as hypothermia, especially for the elderly and young children, who are more vulnerable to the effects of cold. According to energy efficiency studies, setting your thermostat to a steady 68 degrees during winter provides the perfect balance of warmth and energy savings.
Additionally, keeping the temperature above this threshold can improve sleep quality. Studies have shown that overly cold environments can disrupt the body’s natural sleep cycles, leading to less restorative rest. For a well-rounded approach, combining proper insulation, sealing leaks, and using draft blockers can help maintain steady indoor temperatures efficiently. Modern programmable thermostats can further optimize heating schedules, allowing for precise control and reduced energy consumption, without compromising comfort.
Regular Inspection and Maintenance Tips
Ensuring regular inspection and maintenance of your home can significantly enhance energy efficiency and prolong the lifespan of your heating systems. Begin by scheduling annual HVAC system checks—experts recommend this at least once a year before the winter months. A clean and well-maintained furnace or boiler can operate up to 20% more efficiently than a neglected one, saving you substantial energy costs over time.
Pay special attention to air filters, which should be replaced every 1-3 months for optimal airflow and a reduction in pollutants circulating indoors. Faulty ductwork is another common issue—leaks in ducts can lead to a 20-30% loss in heated air, making your system work harder to maintain desired temperatures. Sealing leaks with proper insulation materials helps prevent this inefficiency.
Inspect windows and doors for drafts or loose seals, as these can account for up to 25-30% of home energy losses. Weatherstripping and caulking around frames are simple yet effective fixes to reduce cold air infiltration. Additionally, clearing outdoor vents and chimneys of debris can prevent dangerous blockages and ensure the safe operation of your heating system.
For water heaters, setting the thermostat to 120°F (49°C) is optimal for energy savings without sacrificing performance. Sediment build-up in water tanks can also reduce efficiency; flushing the tank annually helps preserve its functionality and extends lifespan.
Keeping detailed records of maintenance tasks and scheduling periodic reminders ensures nothing is overlooked, creating a more comfortable and energy-efficient living environment.
What Components Might Need to Be Replaced to Stop Freezing?
To stop freezing, focus on these key components:
- Pipe Insulation – Replace or add insulation to exposed or poorly protected pipes to prevent heat loss and freezing. Foam pipe covers are simple and effective.
- Heating Cables – If existing heating cables are damaged or outdated, replace them to ensure reliable and consistent warming for vulnerable pipes.
- Thermostatic Controls – Upgrade malfunctioning thermostatic controls to maintain proper temperatures and prevent freezing in critical areas.
- Outdoor Faucets and Hose Bibs – Replace old or damaged outdoor faucets with frost-free models to reduce freezing risks in winter months.
Addressing these specific components can significantly reduce freezing issues and improve overall system reliability.
When to Replace the Fan Motor or Blower Wheel
The fan motor and blower wheel are critical components in your HVAC system, ensuring efficient air circulation and temperature regulation. Over time, wear and tear may diminish their performance, leading to inefficiencies and potential system failures. Here are detailed signs and considerations to determine when replacement is necessary:
- Unusual Noises During Operation: Grinding, squealing, or rattling sounds coming from the furnace or air handler could indicate damage to the blower wheel or motor bearings. Ignoring these sounds may lead to further damage and higher repair costs.
- Decreased Airflow: If you notice a significant drop in airflow from your vents, it may be due to a failing blower wheel or an underperforming fan motor. This can negatively impact your HVAC system’s ability to heat or cool your home efficiently, potentially leading to increased energy bills.
- Overheating or Motor Failure: A fan motor that repeatedly overheats or shuts down unexpectedly is a clear sign of wear or electrical issues. Overheating can lead to permanent damage if not addressed promptly.
- Imbalance or Visible Damage: Physical inspection of the blower wheel may reveal bent fins, cracks, or debris buildup, which can cause it to become unbalanced. An imbalanced blower wheel not only affects performance but can also damage other system components over time.
- Energy Inefficiency: If your HVAC system is running longer cycles or consuming more electricity than usual, the fan motor may be struggling to maintain consistent airflow. This inefficiency often points to the need for a replacement.
- Age of Components: Fan motors and blower wheels typically last 10–15 years with proper maintenance. If your HVAC system is older, proactively replacing these components may prevent unexpected failures and ensure optimal performance.
Identifying a Faulty Humidity Sensor
When identifying a faulty humidity sensor, I typically start by checking if the sensor readings are consistent with actual humidity levels. If the readings seem inaccurate or fluctuate erratically, it’s a clear sign something may be wrong. I then inspect the sensor for any visible damage, dirt, or corrosion, as these issues can impact its functionality. Testing the sensor with a calibrated device or resetting it to default settings can also help confirm whether it’s malfunctioning. If these steps don’t resolve the issue, I usually recommend replacing the sensor to restore accurate performance.
Checking the Compressor and Refrigerant Levels
When checking the compressor and refrigerant levels, I start by visually inspecting the compressor for any signs of physical damage or wear, such as leaks, unusual noises, or overheating. To ensure the refrigerant levels are correct, I use a gauge set to measure the pressure and compare it to the manufacturer’s specifications. If the levels are too low, it could indicate a leak in the system, which I then locate and address before recharging the refrigerant. This process helps maintain optimal performance and prevents further issues.
Reference Sources
-
A New Approach for Air Dehumidification at Refrigerator Temperatures2:
- Methodology: This study investigated the performance of a Proton Exchange Membrane (PEM)-based dehumidifier under low temperatures (-10°C to 10°C). The research focused on the effects of temperature, voltage, and airflow on dehumidification efficiency.
- Findings: The study found that at sub-zero temperatures, the dehumidifier’s performance was affected by icing and swelling within the membrane. Despite these challenges, the system maintained competitive efficiency. The research highlighted the importance of addressing icing issues for effective dehumidification in cold environments.
-
Experimental Study on Cooling and Dehumidification Performance of an Ice Storage Air Conditioner3:
- Methodology: This research explored the cooling and dehumidification performance of an ice storage air conditioner designed for underground refuge chambers. The study analyzed the impact of air velocity, temperature, and humidity on system efficiency.
- Findings: The study revealed that ice formation at temperatures below -15°C could impact dehumidification efficiency. It emphasized the need for optimized airflow and temperature control to prevent freezing and maintain performance.
Frequently Asked Questions (FAQs)
Q: Why does a dehumidifier freeze up?
A: A dehumidifier may freeze up due to insufficient air flow across the evaporator coils, low refrigerant levels, or a malfunctioning humidistat. Common reasons include a dirty filter, blocked air vents, or operation in temperatures below 65 degrees.
Q: How can you defrost a dehumidifier?
A: To defrost your dehumidifier, turn it off and move the dehumidifier to a warmer room where the temperature is above 65 degrees. Ensure the fan is running to help melt any frost or ice on the coils.
Q: What should you do if your dehumidifier coils are freezing?
A: If the dehumidifier coils are freezing, first check if the filter is clean and that there is adequate air flow. Clean the coils if necessary and make sure the fan is running properly to prevent coils that are icing.
Q: How do you fix a dehumidifier that starts to freeze?
A: To fix this problem, clean the filter and condenser coils, check the fan motor, and ensure that the unit is not low on refrigerant. If issues persist, you may need to repair a dehumidifier by consulting a professional.
Q: What causes the dehumidifier to freeze up in cold rooms?
A: A dehumidifier can freeze up in cold rooms due to the cold coil failing to defrost properly. Move the dehumidifier to a warmer location or increase the room temperature to prevent the coils from freezing.
Q: How can you keep your dehumidifier running efficiently?
A: Regularly clean the filter and condenser coils, ensure the dehumidifier fan is running smoothly, and check that the humidistat is functioning correctly. This maintenance will help prevent frost or ice build-up.
Q: What does it mean if a dehumidifier is low on refrigerant?
A: Low refrigerant levels can cause the dehumidifier to perform inefficiently and may cause the dehumidifier coils to freeze. This typically requires professional service to repair a dehumidifier.
Q: What should you do if the dehumidifier needs to be moved?
A: If you need to move the dehumidifier, ensure it is turned off and unplugged. Move the dehumidifier to a warmer area and ensure it is placed in a location with adequate air flow and space around it.
Q: How do you identify the model number for replacement parts?
A: The model number can usually be found on a label on the back or bottom of the dehumidifier. Use this number when ordering replacement parts or when consulting a professional for repairs.